If you’re looking for a way to switch up your nail game, coffin nails are a great option. In this guide, we’ll show you how to create sage green nails that will make any outfit pop. We’ll provide step-by-step instructions, professional tips, and more! So whether you’re a beginner or an experienced nail artist, this guide has something for you!
Coffin nails: trendy and elegant nail shape
Coffin nails have been a popular nail shape for years, and it’s easy to see why. They’re elegant, stylish, and can be worn with any outfit. If you’re thinking about trying coffin nails but don’t know where to start, this guide is for you! We’ll show you how to create sage green nails that are both trendy.
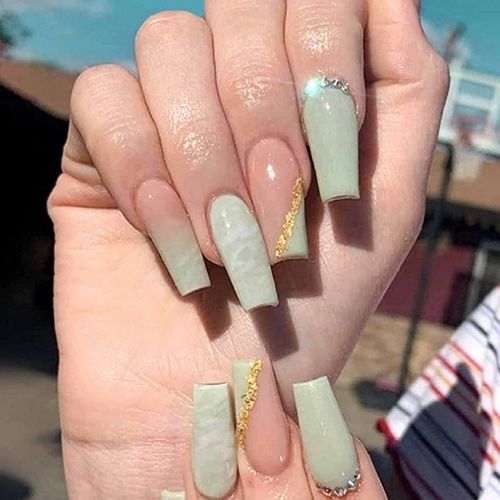
 | Kamize Sage green nails with gold glitter, rhinestones and ombre design [Extra Long] Colors: nude, sage green, gold 1.700+ Ratings | |
 | Artquee Press-on sage green nails with glossy finish [Medium length] Colors: sage green 1.500+ Ratings | |
 | Sunjasmine Almond press-on nails with wave decor [Medium length] Colors: sage green, nude beige 500+ Ratings | |
 | YOSOMK Press-on nude and sage green acrylic coffin nails with gold line design [Long] Colors: sage green, nude 450+ Ratings | |
 | YOSOMK Press-on almond nails with sage green and milk white elements graphic and nail art [Medium length] Colors: milk white, sage green, matte 400+ Ratings |
Here’s what you’ll need:
- Sage green polish;
- Base coat;
- Top coat;
- Nail file;
- Nail clippers;
- Orangewood stick (or cuticle pusher);
- Cotton balls (or pads);
- Nail polish remover.
How to create coffin nail shape with different materials
There are many different ways to create the perfect coffin nail shape. The most important thing is to ensure that your nails are all the same length. You can use either a nail file or clippers to achieve this. Once you have the desired size, it’s time to start shaping your nails. If you’re using a nail file, begin by filing down the sides of your nails until they’re slightly rounded. Then, use the file to create a point at the tip of your nail. For those using clippers, simply clip the sides of your nails and then use the clipper to make a point at the tip.

Once you have achieved the desired shape, it’s time to add some color! Begin by applying a base coat to your nails. This will help the polish adhere to your nails and prevent them from chipping. Then, apply two coats of sage green polish to your nails. Allow each coat to dry completely before applying the next. The same process will work with any color: olive green coffin nails, matte black coffin nails, etc. Once you’re finished, seal your manicure with a top coat.
And that’s it! You now have chic and trendy sage green nails!
How to color sage green nails
Sage green is a great color for both spring and fall. It’s perfect for those who want to add a pop of color to their nails without going too crazy. To create sage green nails, start with a base coat. This will help the polish adhere to your nails and prevent them from chipping. Then, apply two coats of sage green polish to your nails. Allow each coat to dry completely before applying the next. Once you’re finished, seal your manicure with a top coat.
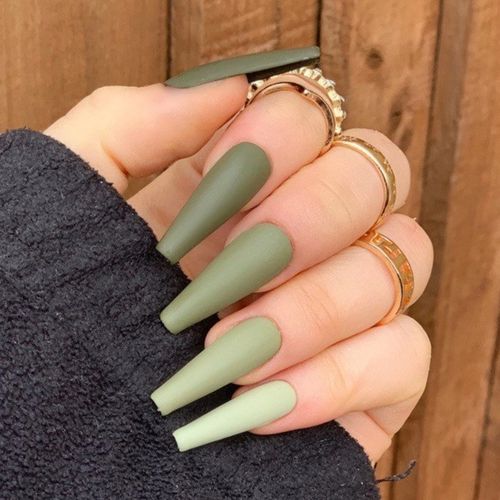
The most popular coffin nail designs in sage green color
There are many different ways to style your sage green nails. You can keep it simple with a solid color, or get creative with different designs. Some of the most popular coffin nail designs include:
- Ombre: Gradually fading from one color to another;
- Glitter: Add some sparkle to your nails with glitter polish. Check out our guide on glitter royal blue coffin nails for detailed instructions and ideas!
- Floral: Add a feminine touch with floral designs;
- Half-moon: A classic design that is easy to recreate at home.
Thanks for reading! Which design will you try first? Let us know in the comments below! Thanks for reading!
Meet our Expert
 Elaine Andrews is a professional nail technician with 12+ years of experience. She works both with gel and acrylic nails and creates artistic nail designs for her customers. She has been training nail technicians for over 6 years and is an author of her own patented nail courses. Feel free to use the comment field below to ask Elaine something you wanted to know about nails and manicures!